Recipes

Roasted Sweet Potato Wedges With Maple And Cinnamon

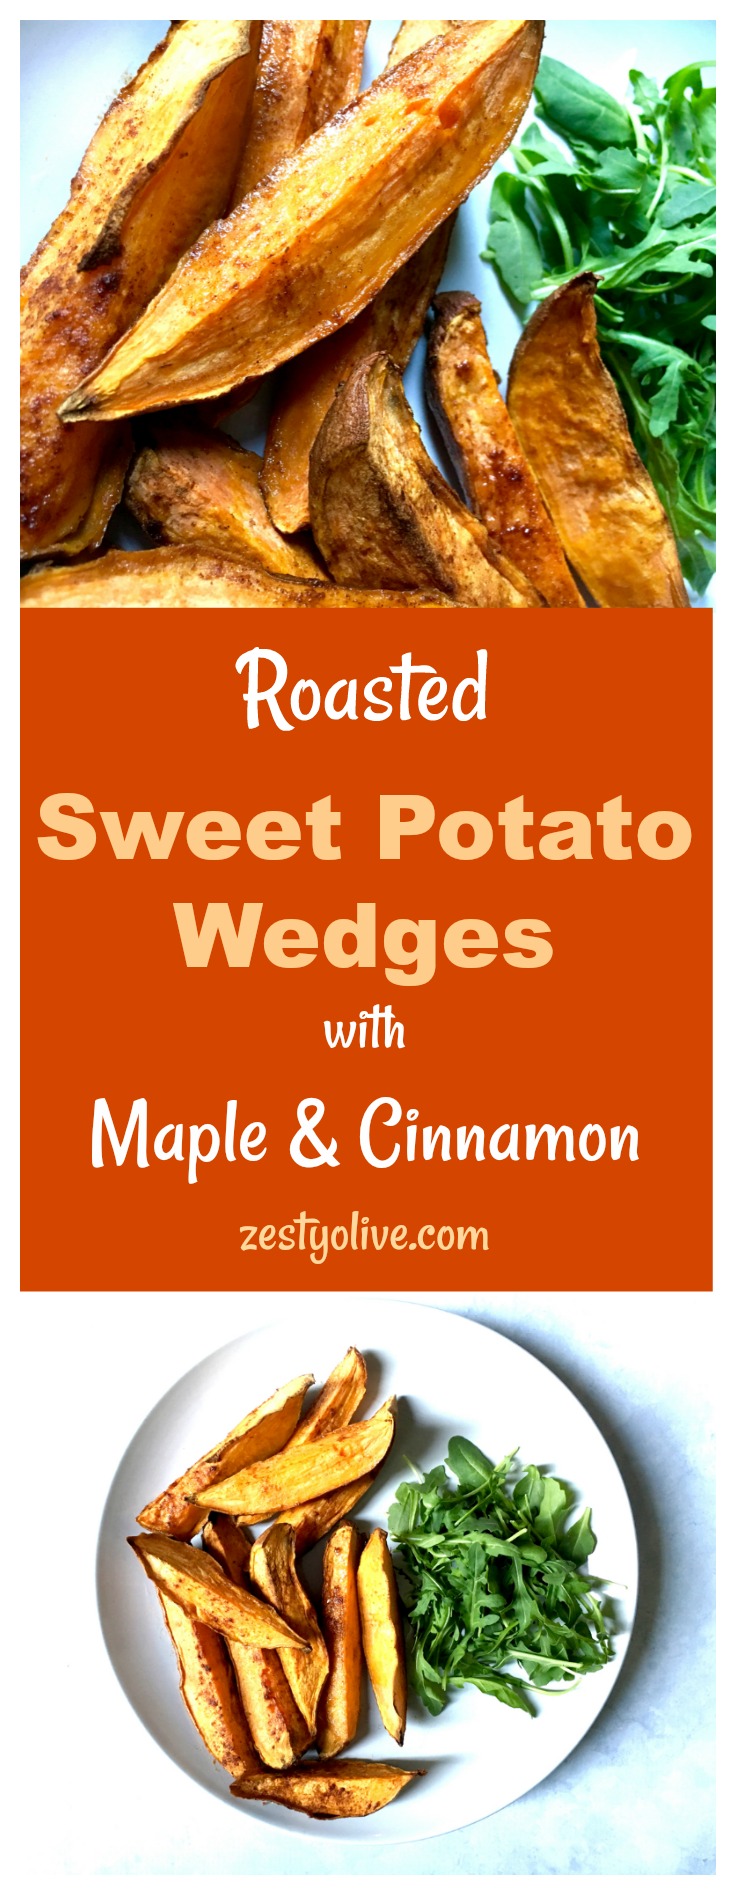
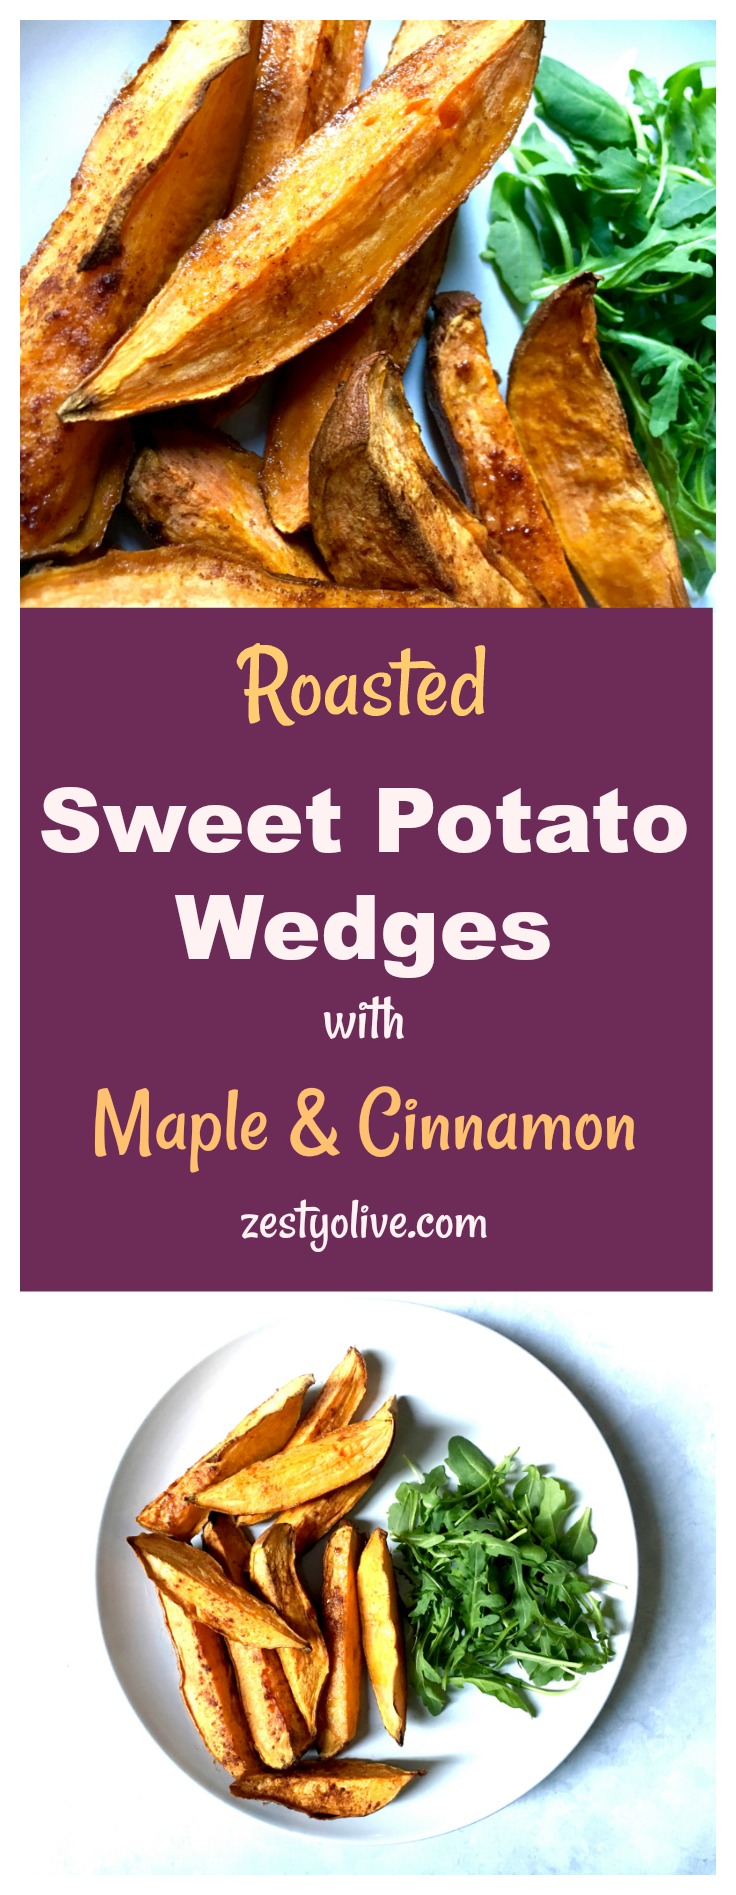
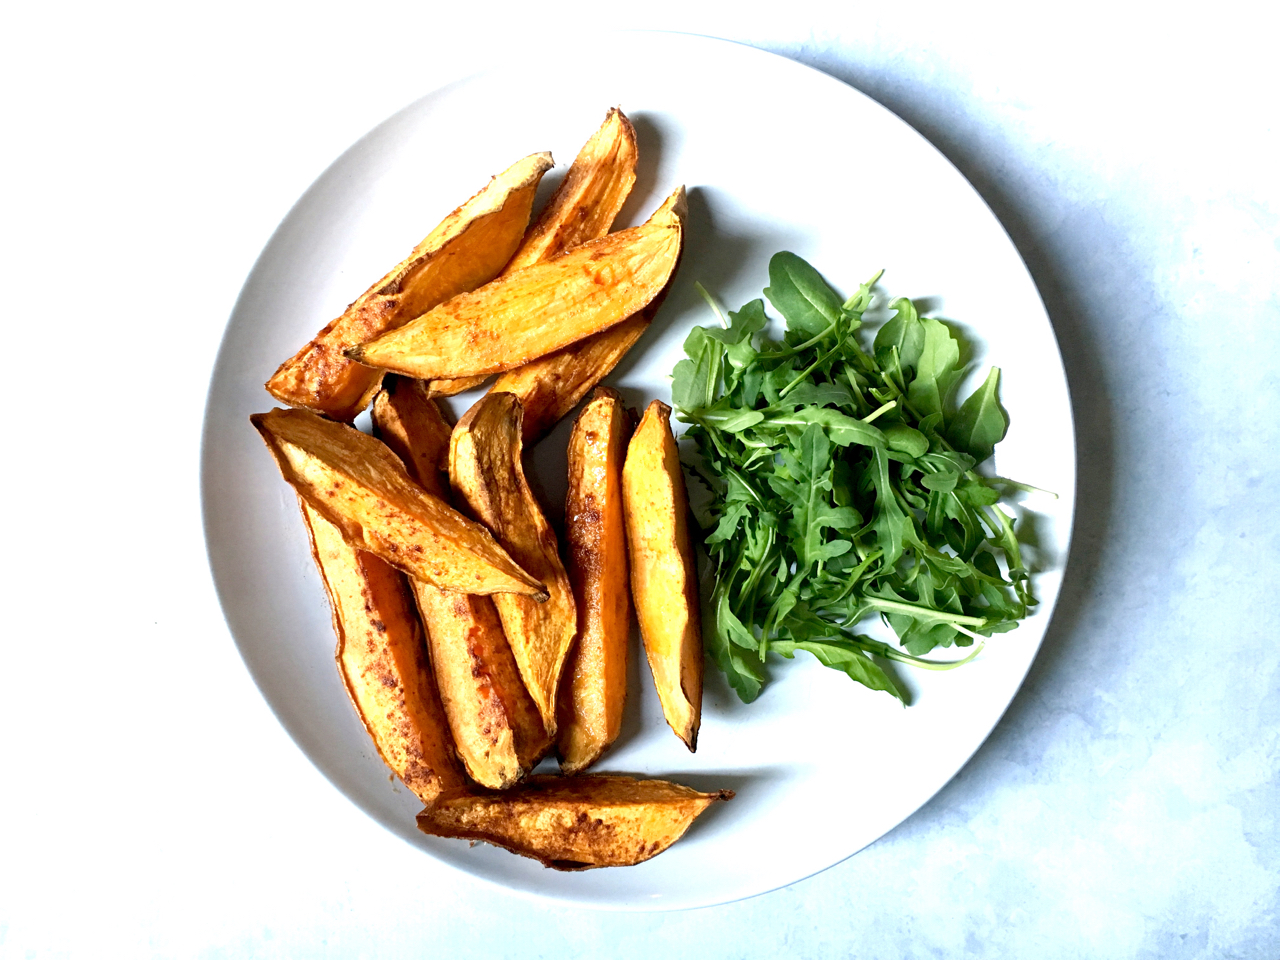
These roasted sweet potato wedges with maple and cinnamon are perfect as a side item, appetizer, or a sweet treat. (Naturally gluten-free)

Roasted Sweet Potato Wedges

Note: This post contains Amazon affiliate links.

Bonus: these sweet potato wedges are naturally gluten-free, healthy, and they’re simple to make. When you’re tired of french fries or mashed potatoes as a side, consider these cinnamon and maple sweet potato wedges.

Roasted Sweet Potato Wedges

Here’s how simple it is to make these. I like to leave the skins on, so be sure you clean, rinse, and dry the potatoes before cutting them into wedges. Sweet potatoes can be difficult to cut, so be sure your knife is up to the task! If possible, choose smaller sweet potatoes rather than larger for this recipe, just because cutting smaller potatoes is easier. Cut them length-wise, and then cut those pieces length-wise again so that you’re cutting wedges and not cubes. Place the wedges on a baking sheet. I like to line my baking sheet with foil for easy clean-up.

Roasted Sweet Potato Wedges

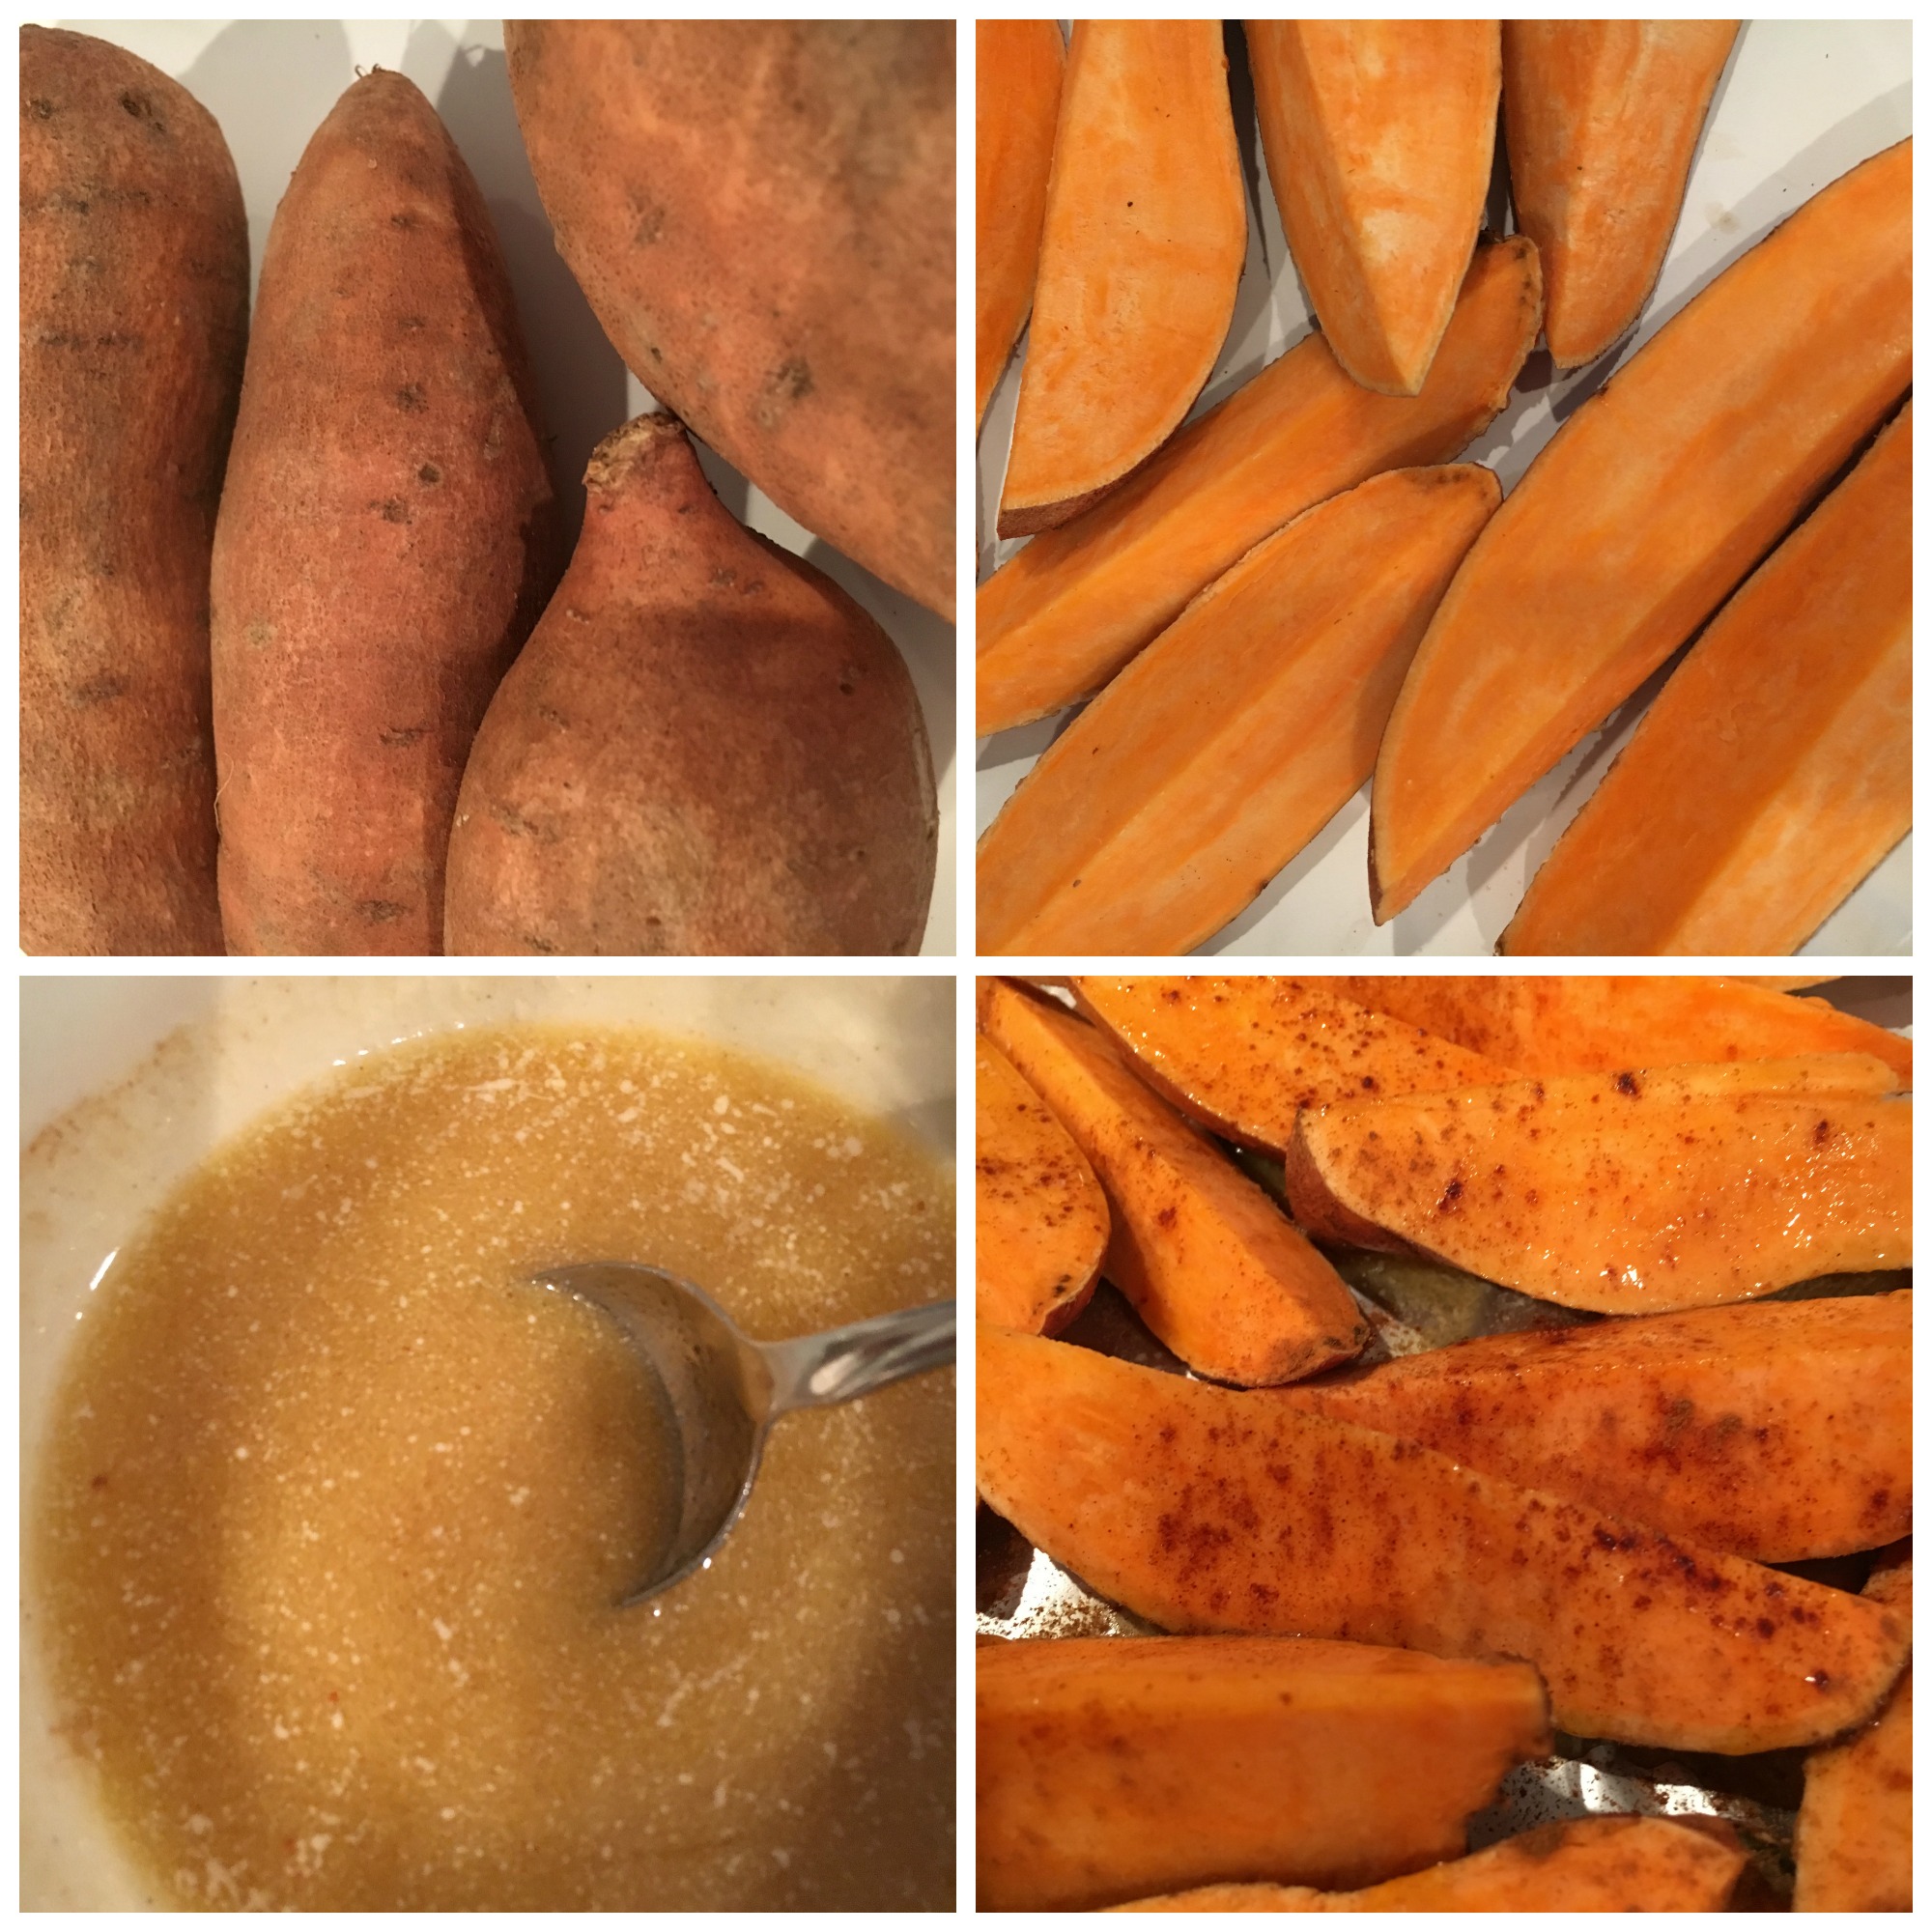
For the maple cinnamon seasoning, which can also double as a dipping sauce, melt half a stick of butter in a microwave-safe bowl (or saucepan if melting on stove top), add 1/4 cup maple syrup and 1 Tablespoon ground cinnamon. If you use unsalted butter, add a pinch of salt. Stir to combine. Drizzle sauce over sweet potato wedges. Don’t drown them, though, and reserve the remaining buttery concoction for dipping, if so desired. (You desire. Trust me. 😉 ) Lightly sprinkle a little more cinnamon on top of the wedges and then pop them into a pre-heated 400° oven for 25-30 minutes or until golden brown and tender. Remove from oven and let cool for 5 minutes before serving.

Roasted Sweet Potato Wedges

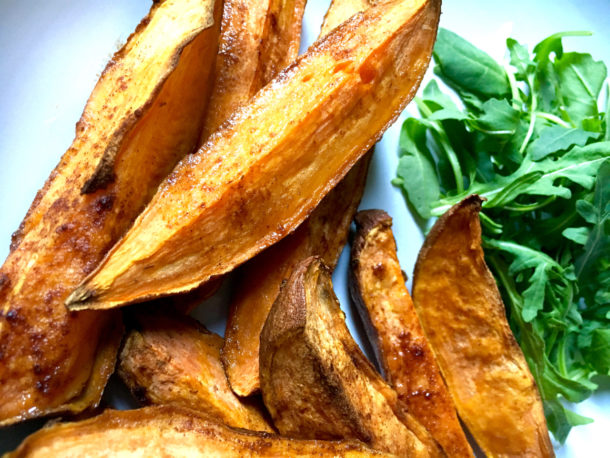
Don’t forget the leftover buttery maple cinnamon sauce for dipping! Or just drizzle the remainder over those crispy wedges and serve!

Note: This post contains Amazon affiliate links.


Would you like to join us on Facebook? Here’s our private group:
Facebook Group Zesty Recipes

Roasted Sweet Potato Wedges With Maple And Cinnamon
 
Prep time
Cook time
Total time
 
Roasted Sweet Potato Wedges With Maple And Cinnamon
Author:
Serves: 2-4
Ingredients
  • 4 medium-sized sweet potatoes, cut into wedges
  • 4 Tablespoon (half a stick) of butter, melted
  • ¼ cup maple syrup
  • 1 Tablespoon ground cinnamon
Instructions
  1. Preheat oven to 400°.

  2. Line a baking sheet with foil; set aside.

  3. Clean, rinse, and dry sweet potatoes before cutting into wedges. Cut them length-wise, and then cut those pieces length-wise again so that you're cutting wedges and not cubes. Place the wedges on the lined baking sheet. Set aside.

  4. Melt butter in a microwave-safe bowl (or saucepan if melting on stove top).

  5. Add maple syrup and ground cinnamon to melted butter and stir to combine. If you use unsalted butter, add a pinch of salt.

  6. Drizzle sauce over sweet potato wedges. Reserve any remaining sauce for dipping, if so desired.

  7. Lightly sprinkle a little more cinnamon on top of the wedges and then pop them into a pre-heated 400° oven for 25-30 minutes or until golden brown and tender.

  8. Remove from oven and let cool for 5 minutes before serving.

  9. Serve with remaining butter sauce for dipping or drizzle remaining sauce over sweet potatoes and serve.

Don’t forget to save to Pinterest!
Roasted Sweet Potato Wedges with Maple and Cinnamon

Save

Save

Save

Save

3 Comments

Grilled Corn On The Cob With Herb Butter

Nothing says summer like grilled corn on the cob with herb butter!

Grilled Corn On The Cob

Grilling vegetables is always a treat, and in the summer, grilled corn on the cob is no exception. Corn is available in abundance during the summer and stores practically give it away when their corn inventory exceeds available display space. Have you ever noticed that? Seriously, we just picked up 8 ears of corn for $2. (Next week they’ll probably have it BOGO!)

Grilled Corn On The Cob

I like to grill the corn and then take it off the cob, freeze it, and use it in yummy recipes later.

But first, here’s a simple way to grill corn without burning it.

Remove the husks from the corn and rinse well and remove any remaining corn silk. Lay each ear of corn on separate sheets of tin foil, very lightly drizzle corn with olive oil and salt and pepper generously. Wrap each ear of corn securely, making sure the ends are closed tightly. (You don’t want the olive oil leaking out and flaming up on the grill.)

Grilled Corn On The Cob

Place each wrapped ear of corn on a preheated grill. Turn flame down to medium. Grill for 15-20 minutes. Turn corn 2 or 3 times to make sure all sides get grilled. To check on progress of corn, using long-handled tongs, remove an ear from the grill and carefully open the foil.

When corn is done, remove from grill and foil packs and serve immediately. I like to add an herb butter to the hot corn. Look at all that buttery goodness! (Here’s my simple recipe for herb butter.)

Grilled Corn On The Cob

If you aren’t feeding a crowd and have some leftover ears of corn, consider cutting the corn off the cob and freezing it for later use. You’ll need two bowls – one large and one small. Place the small bowl upside down inside the larger bowl. Take a cooled ear of corn and place it upright on the small bowl. Holding the top of the corn with one hand, use a sharp knife to cut down the side of the cob. The corn will fall into the larger bowl. Turn the corn and continue slicing off all the corn. Repeat with remaining ears of corn. Place corn, divide if necessary, in quart-sized freezer bag and freeze for later use.

Grilled corn off the cob

Enjoy!

Grilled Corn On The Cob

Grilled Corn On The Cob With Herb Butter
 
Prep time
Cook time
Total time
 
Grilled Corn On The Cob With Herb Butter (Here's my recipe for Herb Butter)
Author:
Serves: 4
Ingredients
  • 4 ears of corn, husked and rinsed
  • olive oil
  • salt
  • pepper
  • Other:
  • tin foil
Instructions
  1. Remove the husks from the corn and rinse well and remove any remaining corn silk.

  2. Lay each ear of corn on separate sheets of tin foil, very lightly drizzle corn with olive oil and salt and pepper generously. Wrap each ear of corn securely, making sure the ends are closed tightly.

  3. Place each wrapped ear of corn on a preheated grill. Turn flame down to medium. Grill for 15-20 minutes. Turn corn 2 or 3 times to make sure all sides get grilled.

  4. To check on progress of corn, using long-handled tongs, remove an ear from the grill and carefully open the foil.

  5. When corn is done, remove from grill and foil packs and serve immediately. I like to add an herb butter to the hot corn. Here's my recipe for herb butter.

  6. How to cut corn off the cob
  7. If you have leftover ears of corn, consider cutting the corn off the cob and freezing it for later use. You'll need two bowls - one large and one small. Place the small bowl upside down inside the larger bowl. Take a cooled ear of corn and place it upright on the small bowl. Holding the top of the corn with one hand, use a sharp knife to cut down the side of the cob. The corn will fall into the larger bowl. Turn the corn and continue slicing off all the corn. Repeat with remaining ears of corn. Place corn, divide if necessary, in quart-sized freezer bag and freeze for later use.

Grilled Corn on the Cob
Grilled Corn On The Cob With Herb Butter


Save

Save

Save

Save

10 Comments

Herb Butter Recipe

Herb Butter Recipe: Elevate your butter experience with fresh herbs!

Herb Butter

Butter alone is marvelous, but add some fresh herbs to it and you’ve crossed over into swoon-worthy territory. Herb butter, also known as compound butter, is a simple way to elevate your food by adding an unexpected flavor explosion to meats, veggies, bread, fruits…anything that would benefit from a delightful smear of butter. I like to use an herb butter for grilled corn on the cob!

Herb Butter

For this simple recipe, I just combined softened butter with fresh oregano. You can use more than one herb, but oregano was all I happened to have on hand. Equally amazing would be thyme, rosemary, dill, basil, parsley, chives…you get the idea. You’re only limited by your imagination.

I added a stick of softened butter (room temperature) to a bowl and stirred it up just a bit by hand. Feel free to use your hand mixer, or stand mixer if you’re doubling the recipe. Once the butter has been lightly stirred, add in your chopped herbs and stir to combine. If using salted butter, you probably won’t want to add any salt. However, if using unsalted butter, add pinch of sea salt.

Herb Butter

Serve immediately or prepare butter for a stay in the fridge or freezer. If storing, put herb butter on a large piece of plastic wrap and shape it into a disc. Cover the disc tightly with the plastic wrap to seal it. Store in the fridge for up 7 days or in the freezer up to 2 months.

Herb Butter

Herb Butter Recipe
 
Prep time
Total time
 
Herb Butter Recipe
Author:
Ingredients
  • 1 stick unsalted butter, softened at room temperature
  • ¼ cup fresh oregano, chopped (or any herb or combination of herbs, such as thyme, rosemary, dill, basil, chives)
  • Pinch of sea salt
Instructions
  1. Add a stick of softened butter (room temperature) to a bowl and beat lightly by hand.

  2. Once the butter has been stirred, add in your chopped herbs and stir to combine.

  3. If using salted butter, you probably won't want to add any salt. However, if using unsalted butter, add pinch of sea salt.

  4. Serve immediately or prepare butter for a stay in the fridge or freezer. If storing, put herb butter on a large piece of plastic wrap and shape it into a disc. Cover the disc tightly with the plastic wrap to seal it. Store in the fridge for up 7 days or in the freezer up to 2 months.


Save

Save

Save

Save

Save

Save

Save

Save

0 comments