Recipes

Roasted Red Pepper And Garlic Hummus

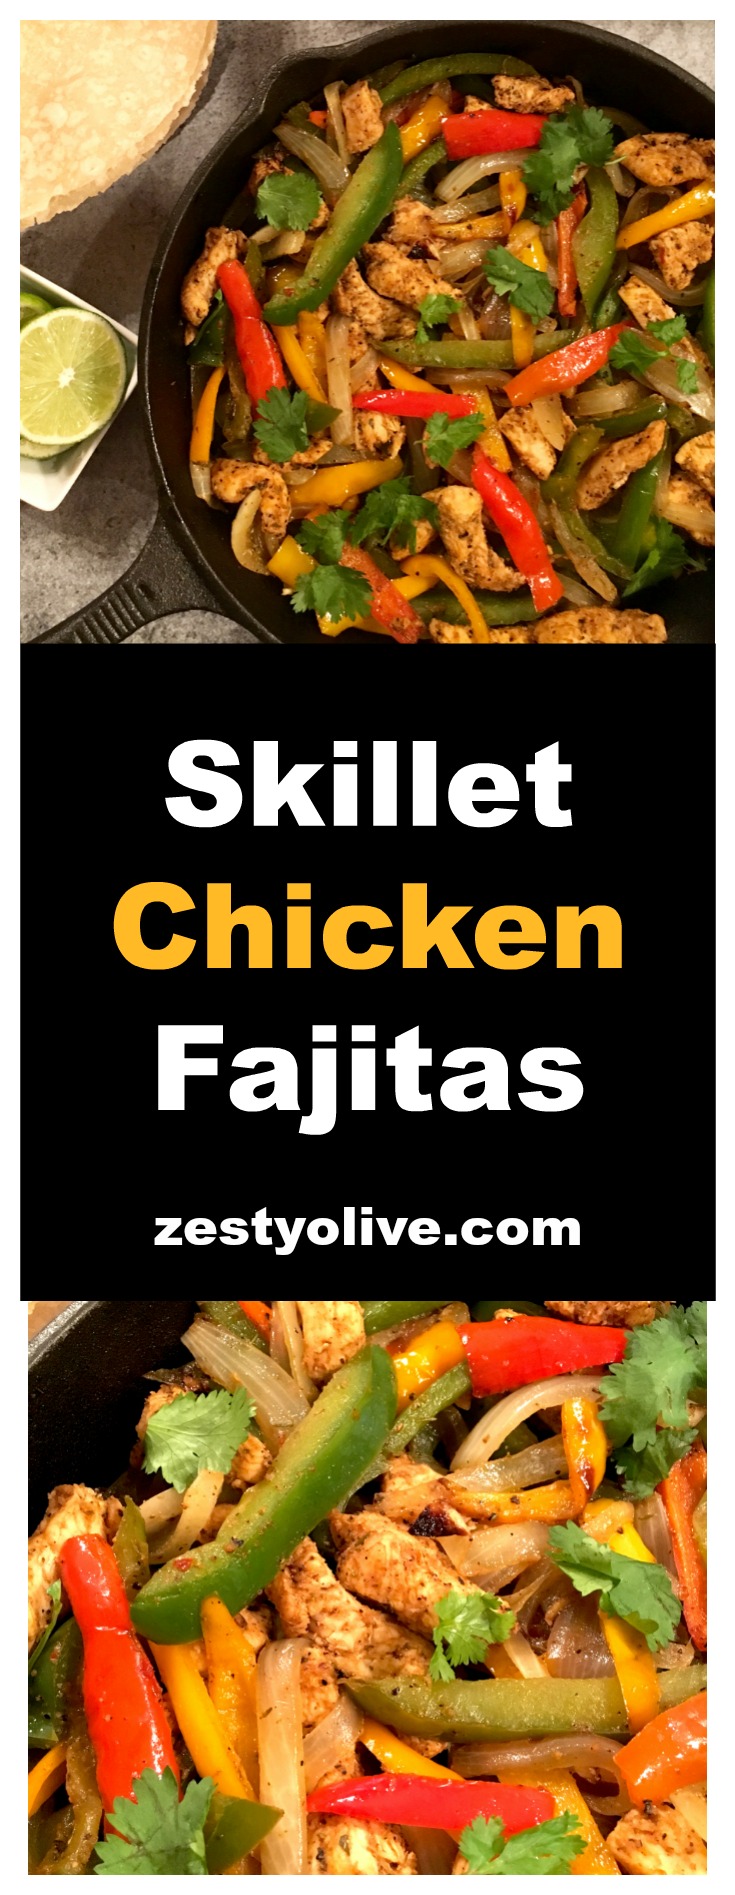
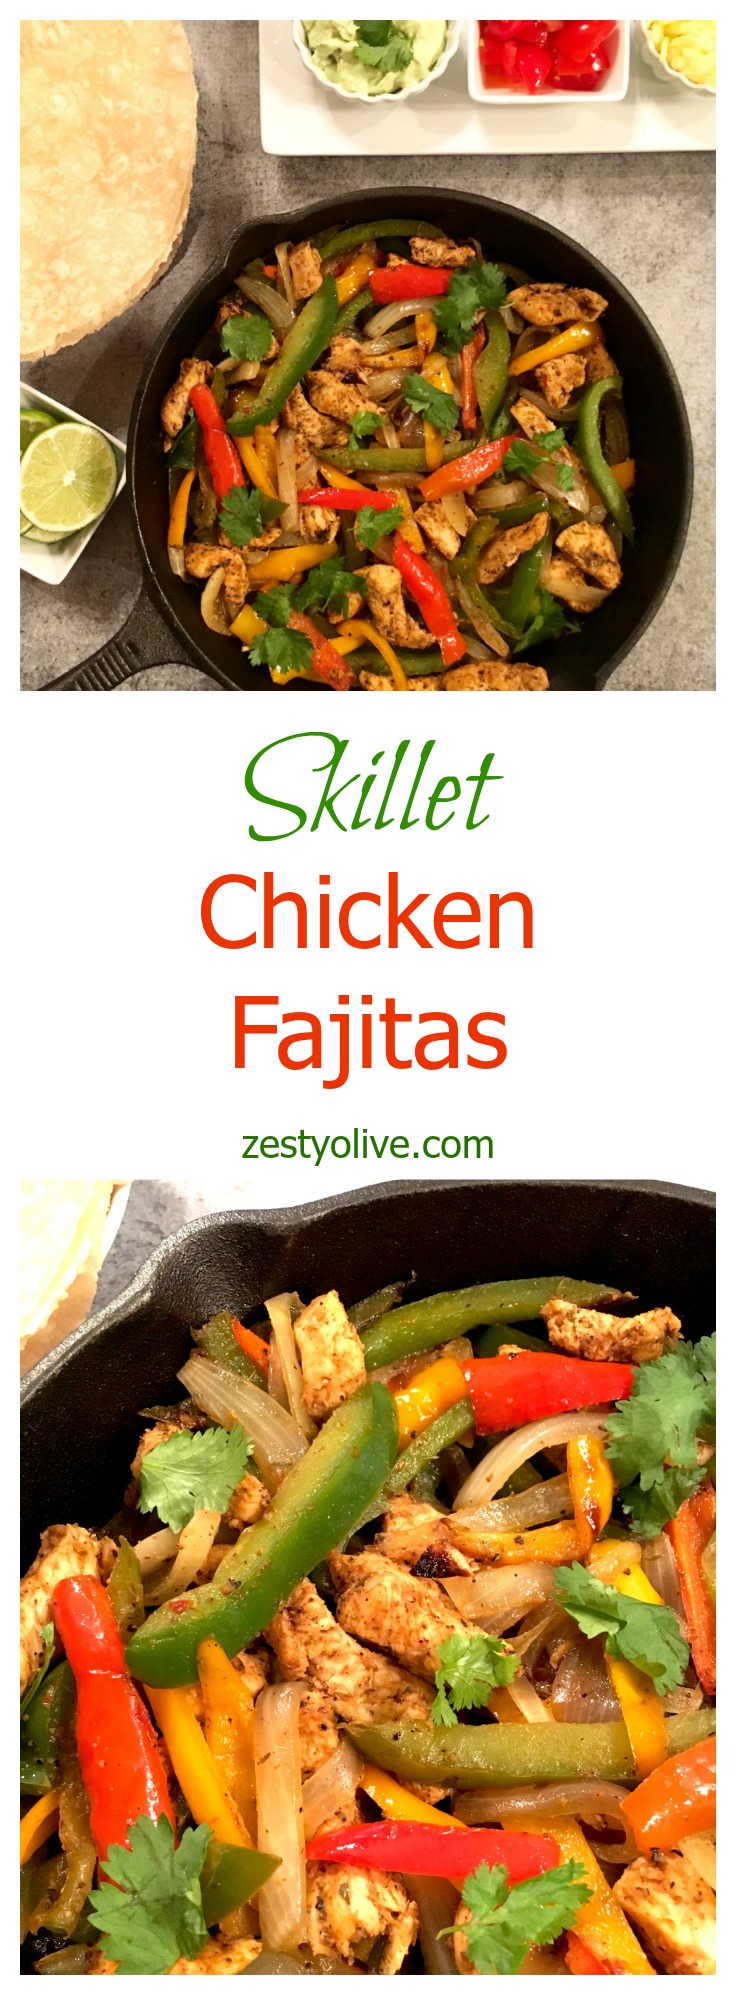
Roasted Red Pepper And Garlic Hummus – a quick and easy appetizer dip for hummus lovers!

Roasted Red Pepper and Garlic Hummus

Note: This post contains Amazon affiliate links.

This spicy roasted red pepper and garlic hummus is so easy to make. It’s made without tahini (only because I didn’t have any on hand) and it’s just as yummy and addicting as any authentic hummus!

I started by roasting a head of garlic because I wanted a mellow garlic flavor. (Here’s how to roast garlic.) Don’t worry – this recipe doesn’t call for the entire head of garlic, so you’ll be able to save the remaining roasted garlic cloves for another recipe. (How about some roasted garlic mashed potatoes, or hot spinach and artichoke dip?)

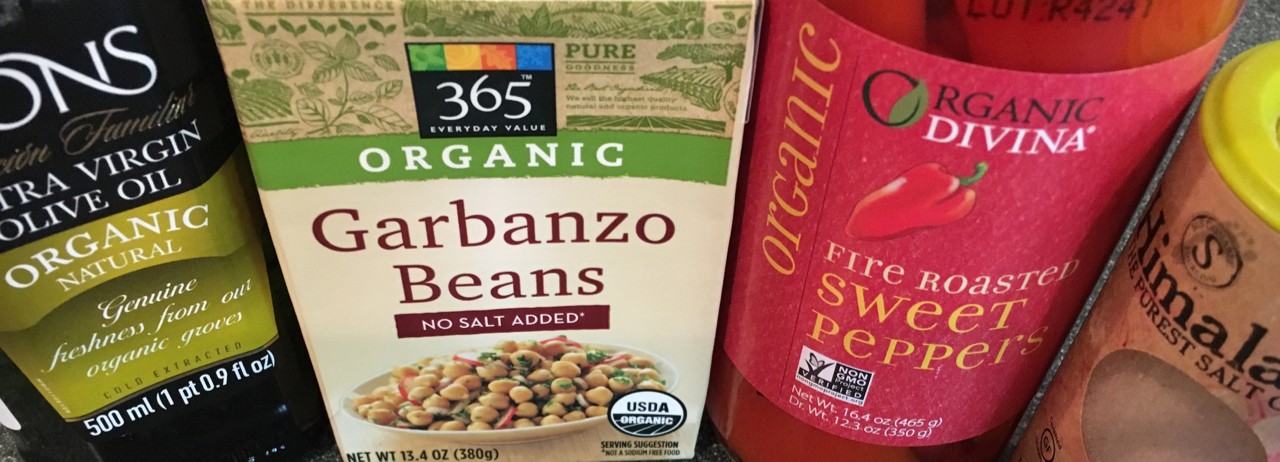
I rinsed and drained a box of organic garbanzo beans, juiced a few limes, whipped out my bottle of extra virgin olive oil, found my sea salt, and chopped a few peppers from a bottle of fire roasted organic sweet peppers.

Roasted Red Pepper and Garlic Hummus

Once the garlic was roasted, I added the garbanzo beans, a few roasted garlic cloves, salt, lime juice and olive oil to a Vitamix blender and blended a few seconds until coarsely chopped. (You could also do this in a food processor.)

Roasted Red Pepper and Garlic Hummus

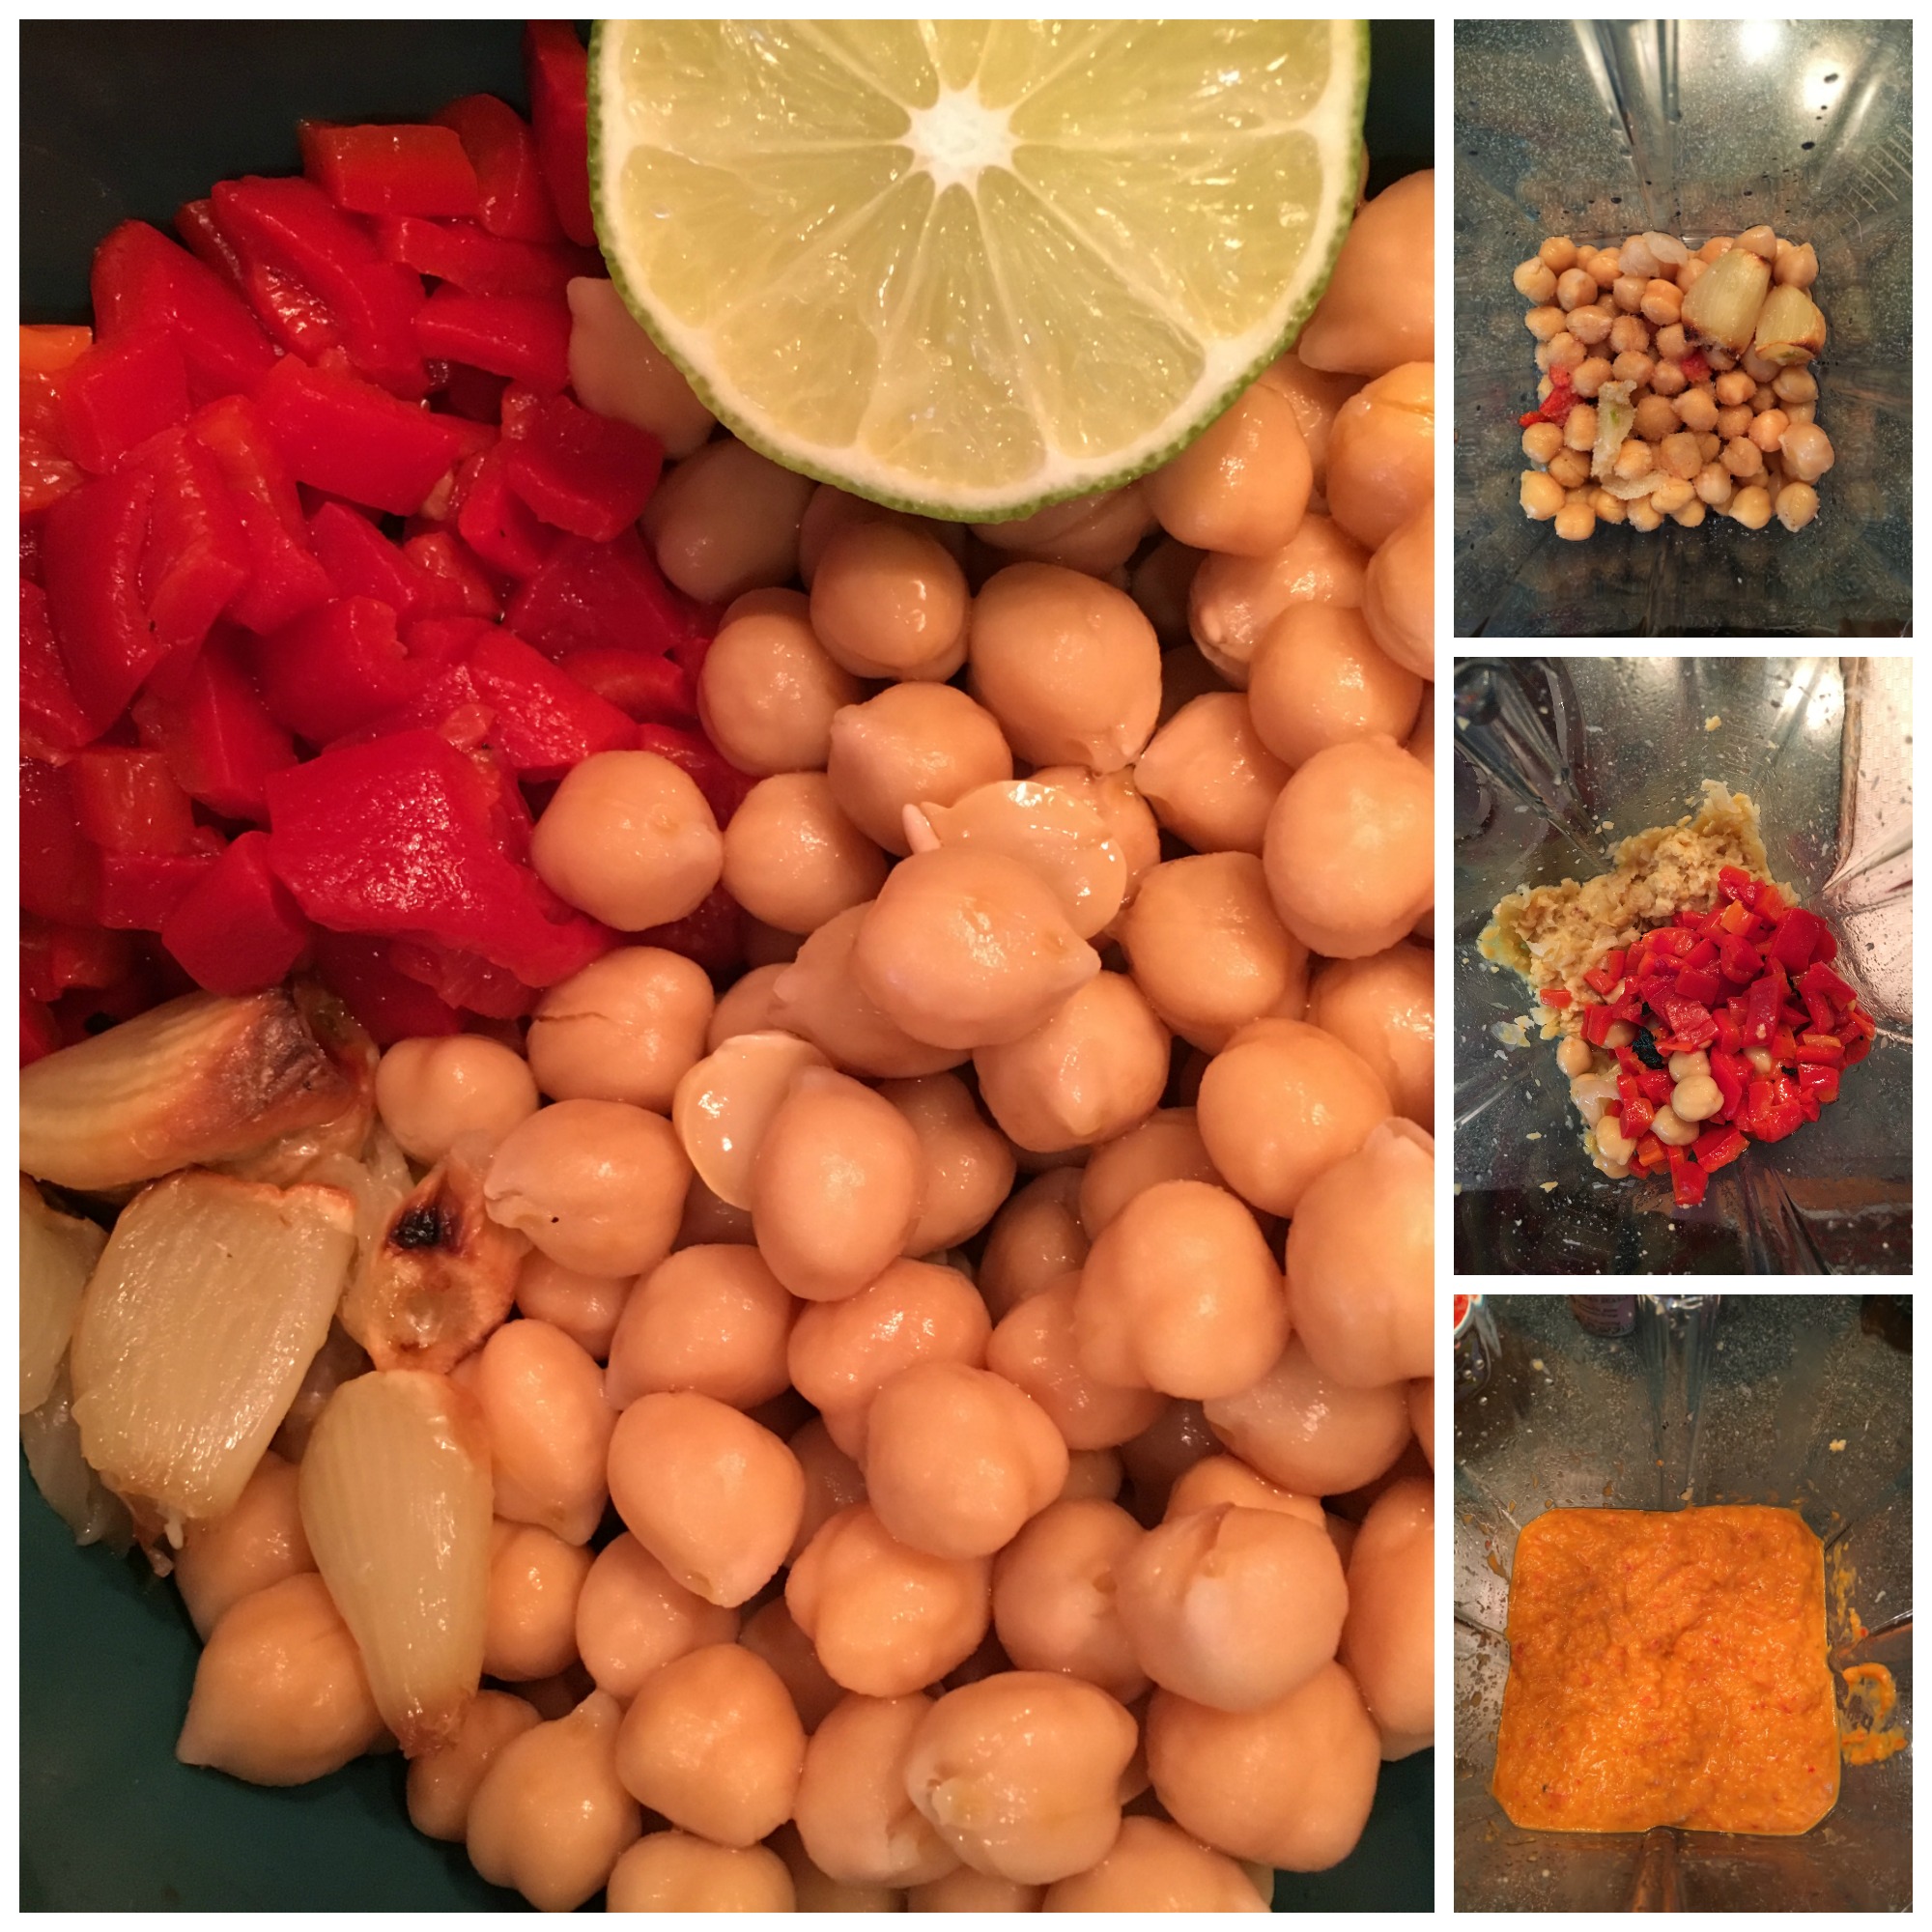
I scraped down the sides of the Vitamix, as needed, and then added the roasted peppers and slowly blended. The trick to mixing this in a Vitamix is to blend slowly and increase the speed as needed as well as scraping the sides as needed. The whole process of blending took under 3 minutes, and this is what it rendered:

Roasted Red Pepper and Garlic Hummus

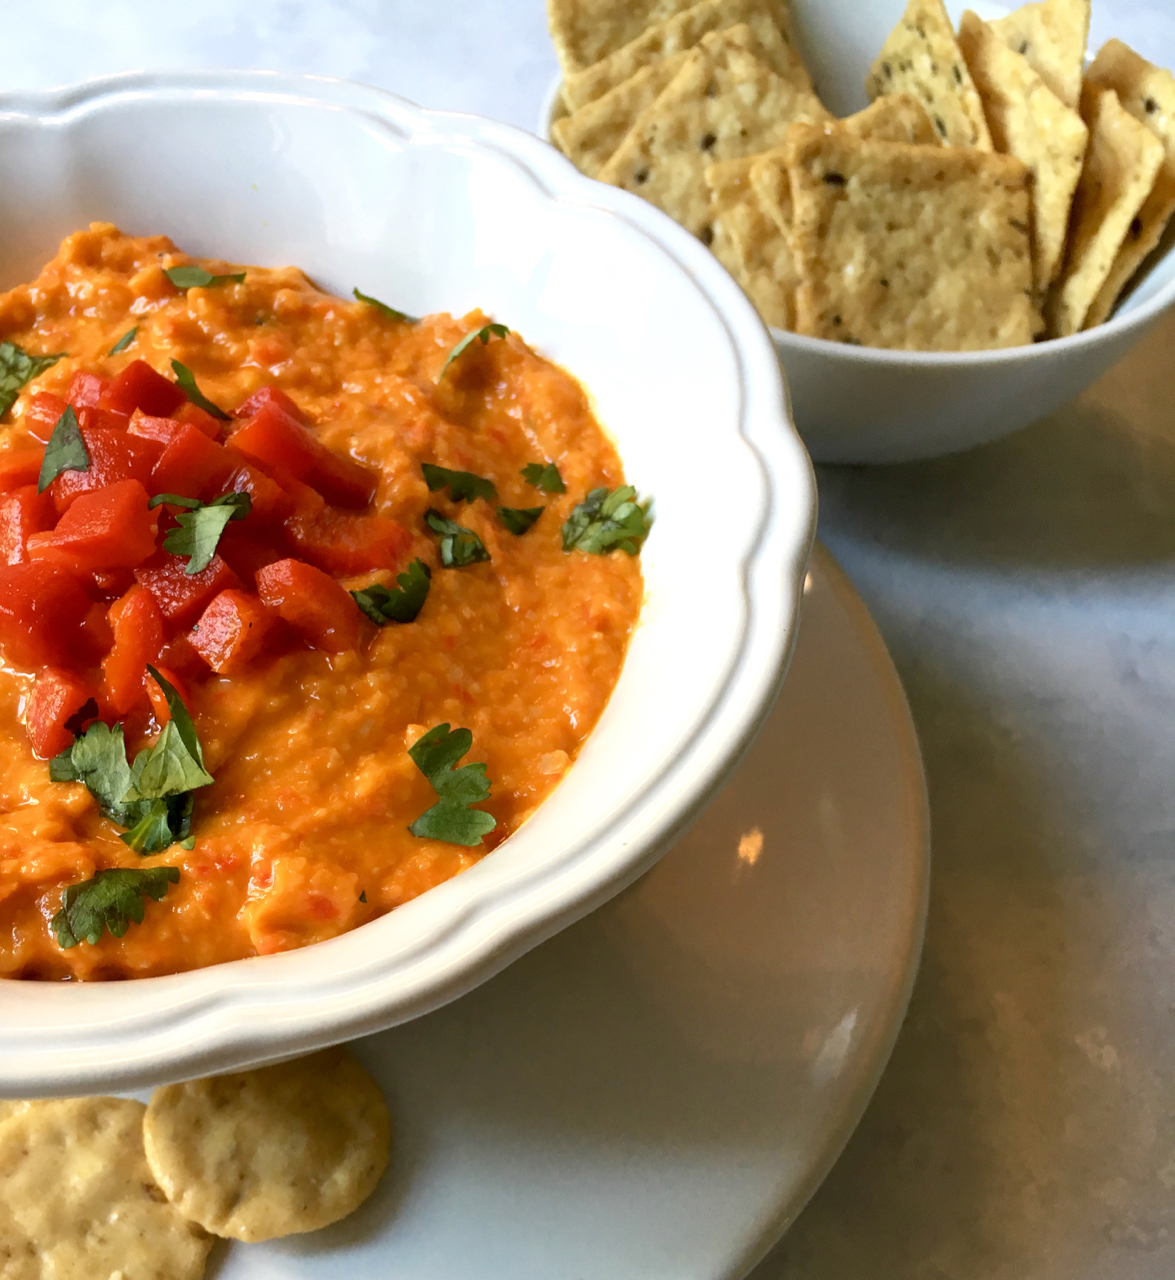
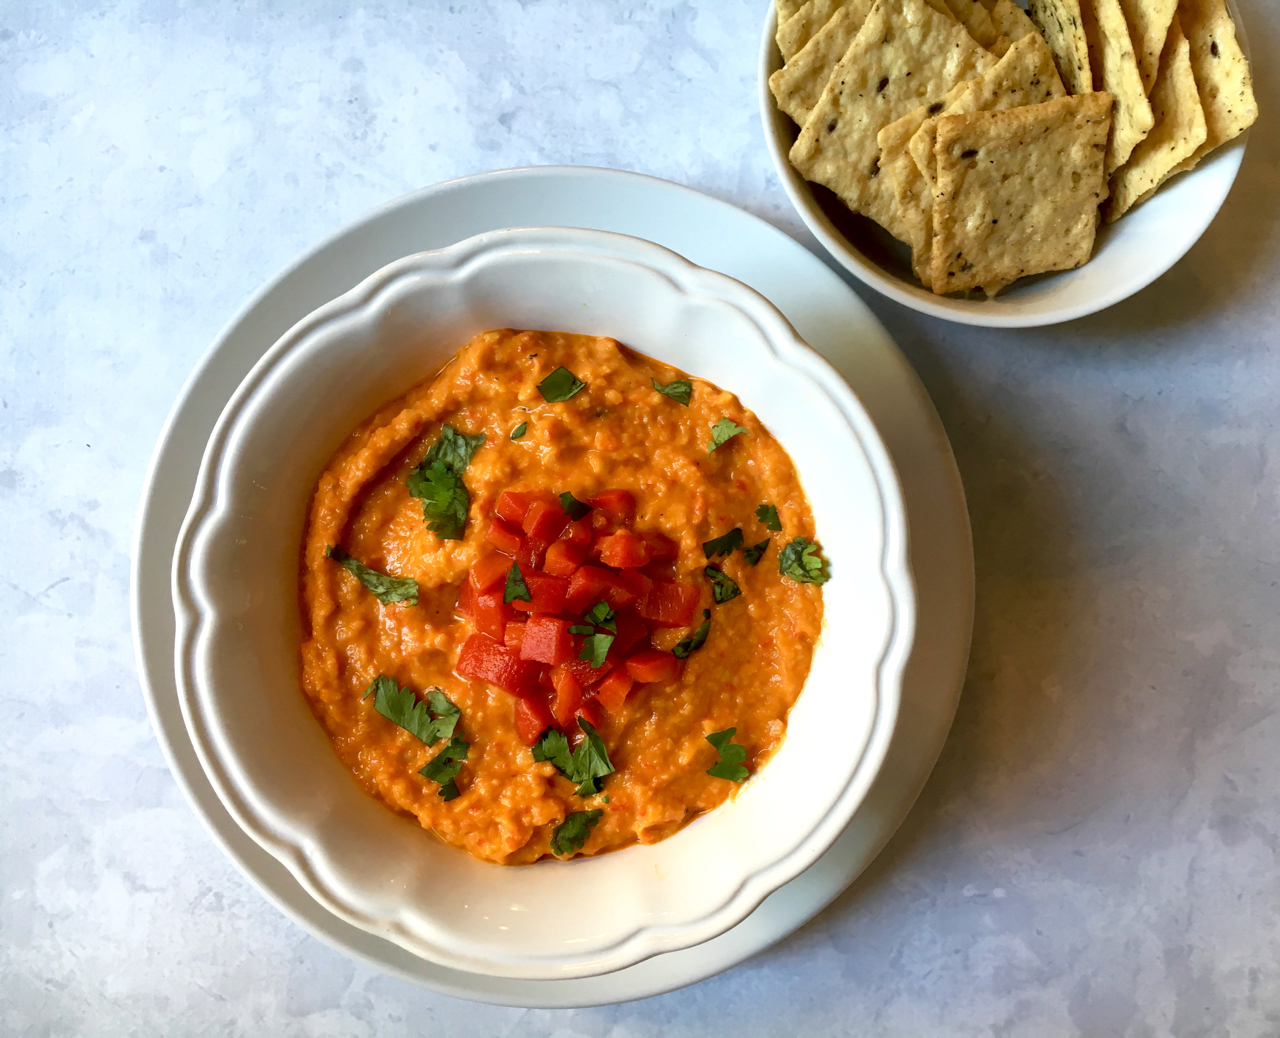
A lovely bowl of spicy roasted red pepper and garlic hummus. I garnished it with a little finely chopped pepper that I reserved, as well as a sprinkle of chopped cilantro.

Roasted Red Pepper and Garlic Hummus

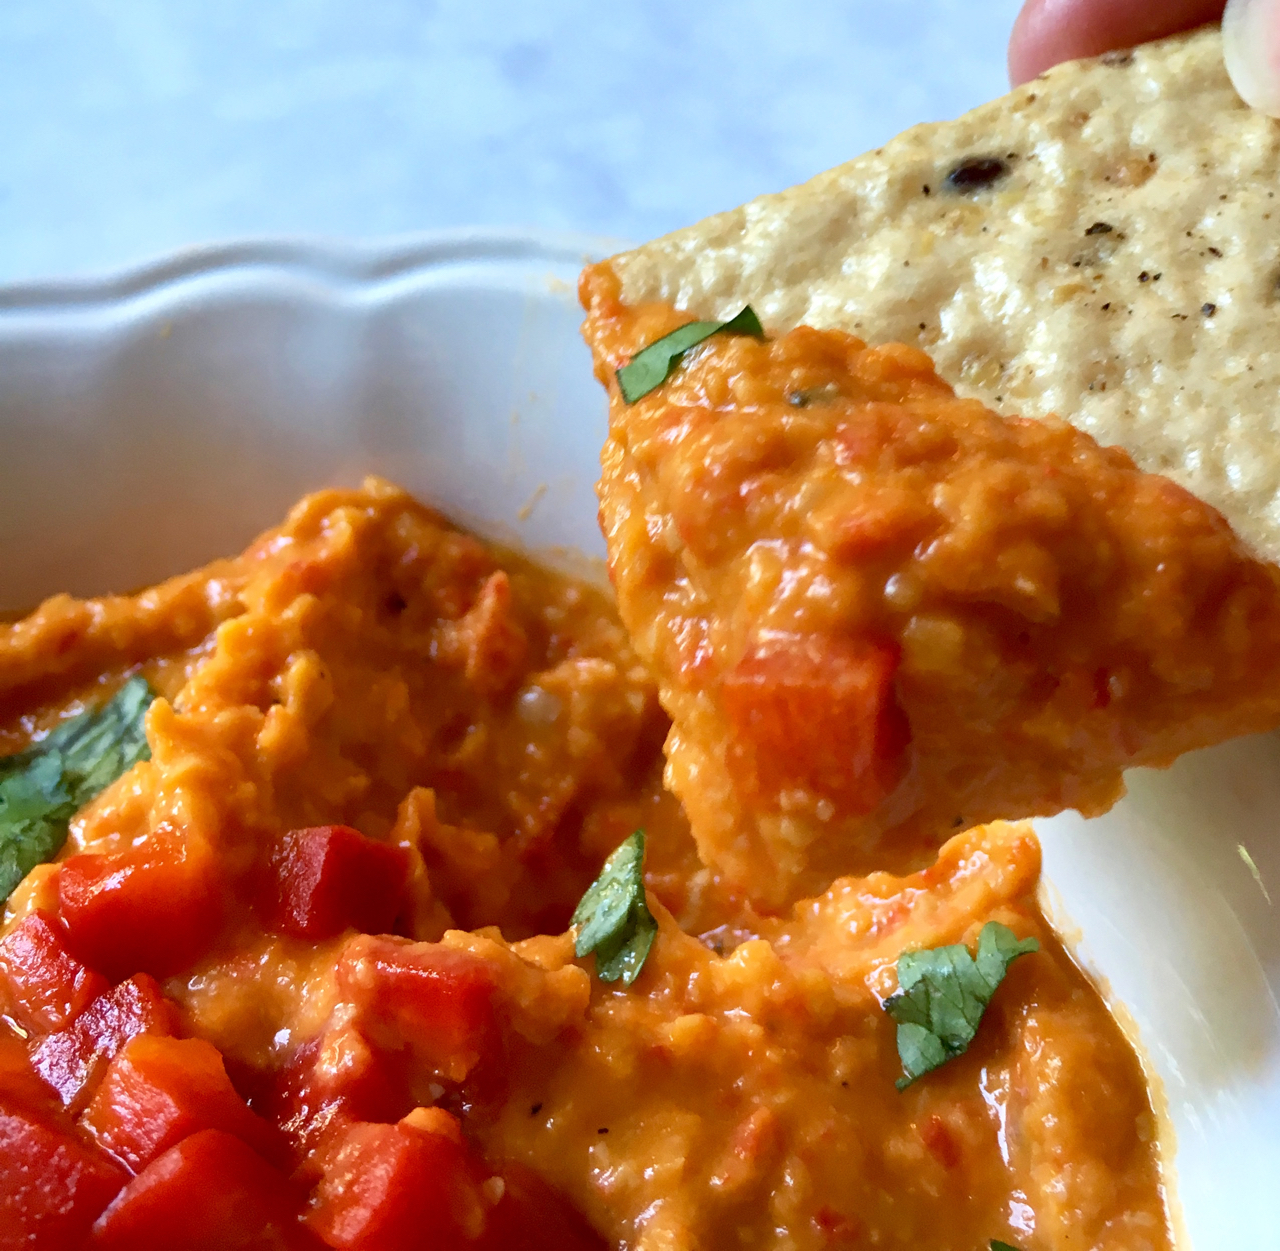
I served it up with some gluten free sesame crackers. Hummus will keep, tightly sealed, in the fridge for a few days, if it lasts that long!

Roasted Red Pepper and Garlic Hummus

If you like these recipes, consider joining the Zesty Recipes Facebook Group. We’d love to have you!

Facebook Group Zesty Recipes


Roasted Red Pepper And Garlic Hummus
 
Prep time
Cook time
Total time
 
Roasted Red Pepper and Garlic Hummus
Author:
Serves: 2-4 servings
Ingredients
  • 1 can(15 oz) OR box (13.4 oz) of garbanzo beans, drained and rinsed
  • 3 roasted garlic cloves
  • ½ cup roasted red peppers, finely chopped
  • ¼ cup extra virgin olive oil
  • 2 Tablespoon lime juice
  • ¼ tsp. salt
  • Garnishes (optional)
  • roasted red pepper, finely chopped
  • cilantro, chopped
Instructions
  1. You will need 3 roasted garlic cloves. If you don't have roasted garlic cloves in reserve and need to roast a head of garlic, refer to this recipe on how to roast garlic.

  2. To a Vitamix (or food processor), add garbanzo beans, garlic cloves, lime juice, olive oil and salt. Blend (or pulse) on low until ingredients are coarsely ground. Scrape down sides, add in peppers and slowly blend (or pulse) until ingredients are blended.

  3. You may need to scrape down the sides of the blender as you go, and if ingredients are too dry, you may want to drizzle a little more olive oil OR water to create desired hummus consistency. Add more salt, if needed.

  4. The key is to blend slowly, stopping to scrape as you go.

  5. Serve in bowl and (optional) garnish with finely chopped roasted peppers and cilantro on top.

DON’T FORGET TO PIN AND SHARE!

Roasted Red Pepper And Garlic Hummus - a quick and easy appetizer dip for hummus lovers!

Roasted Red Pepper And Garlic Hummus - a quick and easy appetizer dip for hummus lovers!


11 Comments

Skillet Chicken Fajitas

Here’s my take on easy, zesty, skillet chicken fajitas, sizzled to perfection in a cast iron skillet.

Skillet Chicken Fajitas

Note: This post contains affiliate links for products on Amazon.

I would love to say that I plan way ahead and marinate the chicken overnight, but I’m not that organized. 😉 Marinating in my kitchen looks like maybe an hour or two in some spicy concoction, and then on with the cooking. For this marinade, I squeezed the juice of three limes, added a little olive oil, and threw in some chili powder, garlic powder, pepper, salt, and a pinch of ground cayenne in a glass bowl. I sliced two chicken breasts in thin strips, threw them in the bowl, stirred to coat all the pieces, covered it and placed it in the fridge while I got busy chopping the veggies.

Chicken Fajitas Marinade

For the veggies, I used a combination of green, orange and yellow bell peppers along with a white onion. Use whatever colorful combo you have on hand. I sliced the peppers and onions in long strips.

While the chicken was still marinating in the fridge, I whipped up some homemade guacamole. Here’s the recipe I used. I grated some cheddar cheese and diced some tomatoes, too. Salsa would have been wonderful, but I forgot all about it!

Once you have all your veggies and sides ready to go, heat up a cast iron skillet and cook the chicken. When the chicken is done, remove it from the skillet and set aside.

PS: I love cast iron skillets. I have several in different sizes. The good folks at Lodge make a variety of sizes, and they’re all made in the USA. 🙂

Skillet Chicken Fajitas

Add your veggies to the skillet and cook until almost tender. Add the chicken back in and continue cooking for a few more minutes. Remove skillet from the heat and serve immediately with flour tortillas and side items. I used gluten-free tortillas here, which you can find at many grocery stores these days, but use your favorite tortilla and you’re good to go!

Skillet Chicken Fajitas

Enjoy these quick and easy fajitas sizzled up in a cast iron skillet!

Skillet Chicken Fajitas

If you like these recipes, consider joining the Zesty Recipes Facebook Group. We’d love to have you!

Facebook Group Zesty Recipes


Skillet Chicken Fajitas
 
Prep time
Cook time
Total time
 
Skillet Chicken Fajitas
Author:
Serves: 2 servings
Ingredients
  • FAJITAS:
  • 2 boneless, skinless chicken breasts, sliced into strips
  • 3 limes, juiced
  • 1 Tablespoon olive oil
  • 3 bells peppers (green, yellow, orange, and/or red), sliced
  • 1 large white onion, sliced
  • ½ tsp. chili powder
  • ½ tsp. garlic powder
  • ½ tsp. ground pepper
  • ¼ tsp. salt
  • pinch of cayenne pepper powder
  • flour tortillas
  • GARNISHES:
  • Guacamole
  • Cheese
  • Salsa
  • Cilantro
Instructions
  1. For the marinade, add lime juice, olive oil, chili powder, garlic powder, pepper, salt, and cayenne pepper to a glass bowl and stir to combine. Set aside.

  2. Slice two chicken breasts into thin strips, and add to marinade bowl. Stir to coat all the pieces, cover and place it in the fridge to marinate for at least 1 hour.

  3. Slice peppers and onions. Set aside.

  4. Prepare sides/garnishes.

  5. When ready to cook chicken, heat cast iron skillet to medium-high heat and add chicken and any remaining marinade. Cook until chicken is done; remove chicken from skillet and cover with foil to keep warm.

  6. Add veggies to the skillet and cook until almost tender. Add chicken back in and cook for a few minutes until veggies are tender.

  7. Remove from heat and serve immediately with warm flour tortillas and side items.

DON’T FORGET TO PIN AND SHARE!

Here's my take on easy, zesty, skillet chicken fajitas, sizzled to perfection in a cast iron skillet.

Here's my take on easy, zesty, skillet chicken fajitas, sizzled to perfection in a cast iron skillet.

Here's my take on easy, zesty, skillet chicken fajitas, sizzled to perfection in a cast iron skillet.

Skillet Chicken Fajitas - easy and delicious! zestyolive.com

Save

Save

23 Comments

Gluten-Free Baked Strawberry Doughnuts With Strawberry Glaze

It’s strawberry season and these gluten-free baked strawberry doughnuts with strawberry glaze were calling my name. They’re super easy to make and are a healthy upgrade to the traditional doughnut. Check them out!

Gluten-Free Baked Strawberry Doughnuts With Strawberry Glaze

Note: This post contains affiliate links for products on Amazon.

It’s strawberry season and these gluten-free baked strawberry doughnuts with strawberry glaze were calling my name. In my haste to make these, solely for the purpose of immediately consuming them, a few silly things happened. I’ll point them out in the photos, starting with the one above. See the lovely white “dots” on the top of the doughnut? This is what happens when you forget to sift the confectioner’s sugar for the glaze. But guess what? It does not affect the taste at all, it just looks silly. Or rustic. Or like it was supposed to happen, right?

No matter. These were delicious. It was hard to stop tasting the glaze even with the spots of confectioner’s sugar!

Gluten-Free Baked Strawberry Doughnuts With Strawberry Glaze

I wanted to make these gluten-free, so I used my old standby, Bob’s Red Mill Gluten-Free One-to One Baking Flour. To that I added, baking powder, organic coconut sugar, and salt. I also used buttermilk in this recipe. If you don’t have buttermilk on hand, just make your own by adding vinegar to milk, which is what I did for this recipe. (Complete instructions are in the recipe details at the end of this post.) You’ll also need an egg, vanilla extract and a little melted coconut oil. And of course, strawberries – you’ll need a cup of finely chopped strawberries.

Here’s a quick look at the batter mix and resulting doughnuts. Notice I over-filled my doughnut pan, because I really wanted only 6 doughnuts. However, you could stretch this batter and get 8 or 9 doughnuts out of it if you do the right thing and fill each doughnut section just 1/2 way full like you’re supposed to. Clearly, I didn’t follow the rules. Again, it did not affect the taste, just the aesthetics, but I didn’t care!

Gluten-Free Baked Strawberry Doughnuts With Strawberry Glaze

While the doughnuts were baking, I mixed the glaze which is just confectioner’s sugar, vanilla extract, a little half and half (or milk), and about 1/4 cup of finely chopped juicy strawberries. Once the doughnuts were baked, I let them cool for about 15 minutes before dunking them in the glaze.

Gluten-Free Baked Strawberry Doughnuts With Strawberry Glaze

I glazed these twice, with a little drying time in between. So pretty (even with the white “dots” of sugar!).

Gluten-Free Baked Strawberry Doughnuts With Strawberry Glaze


This is my favorite donut pan!

Gluten-Free Baked Strawberry Doughnuts With Strawberry Glaze

Okay, I couldn’t wait any longer – I had to have a bite!

Gluten-Free Baked Strawberry Doughnuts With Strawberry Glaze

They were delicious! If you have leftovers(!?), refrigerate them.

**Pro doughnut-eater tip: They taste amazing the next day if you heat them for about 20 seconds or so in the microwave to warm them up a bit. Do not overheat! But do enjoy them warm.

Gluten-Free Baked Strawberry Doughnuts With Strawberry Glaze

YOU MAY ALSO LIKE:
Gluten-Free Almond Butter and Chocolate Chip Brownies
Flourless Chocolate Brownies
Cherry Chocolate Chip Blondie Bars (Gluten-Free)


Gluten-Free Baked Strawberry Doughnuts With Strawberry Glaze
 
Prep time
Cook time
Total time
 
Gluten-Free Baked Strawberry Doughnuts With Strawberry Glaze
Author:
Serves: 6-8
Ingredients
  • DOUGHNUTS
  • 1 cup Bob's Red Mill Gluten Free 1-to-1 Baking Flour
  • ½ cup organic coconut sugar
  • 1 teaspoon baking powder
  • ¼ teaspoon salt
  • 1 egg
  • ½ cup buttermilk
  • (to make your own buttermilk, combine ½ cup half and half (or milk) and ½ teaspoon white or apple cider vinegar. Let it sit for about 10 minutes to form buttermilk.)
  • 2 teaspoons vanilla extract
  • 3 Tablespoons coconut oil, melted and cooled
  • ¾ cup fresh strawberries, diced and sitting in their own juices

  • GLAZE:
  • ¼ cup fresh strawberries, diced and sitting in their own juices
  • 1½ cups confectioners sugar
  • 1 teaspoon vanilla extract
  • ¼ cup half and half
Instructions
  1. TO MAKE THE DOUGHNUT BATTER:
  2. Preheat oven to 375°F and oil the doughnut pan with coconut oil. Set aside.

  3. Melt the coconut oil and set aside to cool.

  4. In a medium mixing bowl, add flour, coconut sugar, baking powder, and salt. Stir to combine.

  5. In a separate mixing bowl, whisk together buttermilk, egg and vanilla extract. Pour in the cooled coconut oil and whisk to combine.

  6. Pour the wet ingredients into the dry ingredients and mix well.

  7. Add in the diced strawberries and stir to combine.

  8. Spoon the batter into the doughnut pan. Do not overfill. You should be able to get 6 to 8 doughnuts out of this batter if you fill each doughnut circle only ½ way.

  9. Bake at 375°F for 8-10 minutes or until golden brown. Inserted knife (or toothpick) and if clean when removed, the doughnuts are cooked through.

  10. Remove from the oven and allow to cool for a few minutes before removing from pan.

  11. Cool on wire rack for at least 15 minutes prior to handling and dipping in the glaze.

  12. TO MAKE THE GLAZE:
  13. Combine ¼ cup diced strawberries with 1 tablespoon sugar. Stir and mash with a fork, letting it sit at room temperature until strawberry juice is produced.

  14. Add this mixture to the confectioners sugar and mix well. Add in half and half and mix. If glaze seems too thick or too thin, add more half and half or confectioners sugar.

  15. Before glazing doughnuts, make sure to have wax or parchment paper under wire rack to catch any glaze drippings.

  16. To glaze doughnuts, dip each doughnut into the glaze and quickly remove, allowing to dry on wire rack.

  17. You may want to re-glaze each doughnut for a thicker coating. If so, just repeat dipping and drying.

DON’T FORGET TO PIN AND SHARE!

It's strawberry season and these gluten-free baked strawberry doughnuts with strawberry glaze were calling my name. They're super easy to make and are a healthy upgrade to the traditional doughnut. Check them out!
Gluten Free Baked Strawberry Doughnuts

3 Comments